JLI NAIJA

HOME OF INFORMATION COMMUNICATION TECHNOLOGY.

JLISMS

Send customized SMS from your phone and pc desktop on the best SMS platform in Nigeria just for 180 kobo per SMS

AGENT NEWS UPDATE

Come and get updates about latest tricks, event, musics, juicy gist and many more

JLI advert Placement

send email to the above address for enquiry

Skales Shoots 'Shake Body' Video (Fun B-T-S Photos)

Skales Shoots 'Shake Body' Video (Fun B-T-S Photos)

A few weeks ago, Skales and his team shot the video for ‘Shake Body’ at location in Lagos, Nigeria. Check out fun photos from the behind the scenes.


From dropping massive singles to headlining shows within and outside the country, Skales, is definitely putting work to become one of the youngest and most successful entertainment CEOs.
A few weeks ago, Skales and his team shot the video for ‘Shake Body’ at location in Lagos, Nigeria. Stanz Visuals, an associate of OHK Entertainment, shot and directed the video.
The hit single, his first since floating his self-owned label has been well received by fans, music enthusiasts and even critics. On social media, there is now a big pool of short clips of different people singing and dancing to ‘Shake Body’, since its release in May 2014.
Below are exclusive behind the scene pictures from the video shoot.


HOW TO TRANSFER BLOG FROM ONE GMAIL TO ANOTHER

Many bloggers would abandon their blog after they applied for adsense and they were denied of approval. They will go about starting a new blog from the scratch because their gmail account will not be giving the chance to re-apply, not knowing that they could move the old blog from the blacklisted email account to a newer email in order to re-apply after correcting the error noted by adsense system.
Today I will be sharing the tutorial on how you can move your blog from one gmail to another without any effect on your blog content and attribute.
Without wasting time, lets get to today business.
  
STEPS
  1. Logging to your blogger dashboard using one browser 
  2. Choose settings from the drop down as show BELOW.
  3. Click on add author and enter the address of the gmail account you want to transfer the blog
  4. Click invite author and wait for it to be invited
  5. Open another browser and login to the e-mail account to accept the invitation 
  6. Open the email received and  click accept invitation
  7. You will be asked to sign in to blogger.com, click sign and confirm your profile detail.(that is if you have not blog using new gmail before)
  8. Sign in and confirm your  as shown bellow
  9. After you confirm your profile as shown above, you will be taken to blogger dashboard which will give you access to the blog as an author
  10. return to the first browser and refresh the page to show your second email info as author
  11. Now set the email from author to admin and then remove the first email from the list
  12. After this, you will not find the blog on the dashboard of the email again, it will only show you the other blogs (that’s if you have more than one blog) 
  13. Now return to the second browser, refresh the page and then enjoy your full access over the blog using your new email account.

That’s all you need to do to move your blog from one gmail account to another.

If you want have many author and admin on blog, all you need to is just to keep inviting the email and do not remove any one them as asked in step 11.

The video for this tutorial will soon be posted just in case you didn’t get it right with the screen shot and instruction, so check back soon, OR drop your comment if you have any challenge doing it.

Airtel Unlimited Browsing With Simple Sever

To many freebrowsing for Airtel this days and guys remember this simple sever still works for MTN till now. get it here http://9jahub.com/forum/showtopic.php?id=2052..

If you dont have simple sever application before see here to download Download Here

Just extract both SS.exe & SS.ini into the same folder.

Stage 2: Then configure ya browser/application

e.g mozila. Tools--->Options---Advance--->Network-->Settings:
Under HTTP proxy use: I.P:127.0.0.1, Port: 8080 and MARK use for all protocol.


copy this file and paste it in you ss.ini to remove the old one..


LHOST = '127.0.0.1'
IMETHOD = 0
ISPLIT = 0
RHTTP = 0
TIMEOUT = 30
PHOST = '212.26.2.90'
RQUERY = ''
RPATH = 0
PTYPE = 0
KEEP = ''
BQUERY = ''
MQUERY = ''
RHTTPS = 1
PPORT = 80
LPORT = 8080
VALHDR0 = ''
VALHDR1 = ''
VALHDR2 = ''
VALHDR3 = ''
IQUERY = 'dataportal.ng.airtel.com/'
ADMODE = 1
CQUERY = ''
CUSHDR2 = ''
CUSHDR3 = ''
CUSHDR0 = ''
CUSHDR1 = ''
ILINE = 0
FQUERY = ''
SBUFF = 1024
RPORT = 0


Copy these config settings and replace the former in the simple server config file


Enjoy while it LAST! -

Glo users:- New Glo Unlimited Freebrowsing For All Devices


This cheat was tested and discovered that it working faster ON TECHNO P3 ANDROID VERSION….
HOW TO DO ALL THE CONFIGURATION


1.Go to settings.
2.Then go to wireless & networks.
3.Continue go to mobile Networks.
4.Then access Point Names
5.Click the Menu button
6.Then select new APN GLO NIGERIA


*.Name: Glo 9jahub
*.APN: glosecure or gloflat
*.Proxy: 82.145.210.145
*.Port: 80
*.Username: blank
*.Password: blank
*.Server: blank
*.MMSC: http://mms.vtext.com/servlets/mms
*.MMS Proxy: blank
*.MMS Port: blank
*.MCC: blank
*.MNC: blank
*.Authentication type: blank
*.APN Type: blank

For Java Phone + Others Download OperaMini 5 Here
FLEX ON OPERA5.1 USE The Below Settings!!:-
http: http://0.facebook.com%3a@server4.operamini.com:80
Socket: http://0.facebook.com%3a@server4.operamini.com:8080

Then Save, Browse and enjoy!!!…

NOTE: If your Opera doesnt Have Such setting Just Connect And start Browsing Or comment Below For Help


Too Much Money"I Spend N500K To Do My Hair" - Muma Gee

Too Much Money"I Spend N500K To Do My Hair" - Muma Gee

In these days when many Nigerians can hardly afford three square meals a day, singer Muma Gee says she spends N500,000 to make her hair. 

Muma Gee is really loaded 


Nigerian female singer, Gift Iyumame Eke, the one everyone knows as Muma Gee, has stirred the hornet's nest by revealing that she spends as much as N500,000 to do her hair, using as much as 11 packs of real human hair in the process.
Her revelation has brought up a lot of talking points with many condemning such extravagance display of money, while some think since it is her money, she is free to spend it on anything she wants.
In an interview, Muma Gee who gave birth to a set of twins recently, said:
I invest a lot in my hair. A lot of cash, energy and time go into my hair. It takes like eight hours to get my hair done.
Basically, it is a special and patient person that can do my hair. Not everybody has the patience or can be meticulous enough to do my hair.
The hair piece alone costs a lot of money, especially in these days of human hair. I normally use 11 packs of human hair and each piece is not less than N60, 000.
At the end of the day, I end up spending about N500, 000 to do my hair at once. It is actually the hair pieces that can go for that amount and those hair pieces can last for years. I have had hair extensions that have lasted for over 10 years.
Each time I remove the weaves, I take it to hair companies and they treat the hair and they are as good as new.
Good one Muma Gee.


HOW TO CHANGE YOUR FACEBOOK NAME AFTER YOU REACH CHANGING LIMIT

Has your Facebook Account Name limit is Reached or Exceeded?
So do you want to change your Facebook Profile Name after Name Limit reach?

If so, just follow the simple method written below,

Mostly many people dont know that facebook keeps some limits for Pages, Profiles, Groups, Friends, Events etc. Just like we can`t change facebook profile name after 5 times, we can`t change our profile username more than 1 time, we can`t change a facebook page name after 200 Likes, we can`t change facebook group name after reaching 250 members, we can`t add more than 5000 friends to our facebook profile and  it is not possible to change the name of an event if it has more than 5000 people invited.

Now-a-Days, many people are keeping facebook profile names in Different stylish Fonts like ȼɦǿȼLąty Þrîñçé, Nitesh Iı'e Belııve'ııŋ Mąh-self, Іі'є-єм Ѕэжҷ'Айԁ Її' Ќйѳщ'Їт, Маиѳг Кнцмая etc. But Facebook is Banning the Accounts who using those type of stylish fonts, fake names.

Also make sure that your name can`t include:

Titles of any kind (ex: professional, religious, etc)
Symbols, repeating characters or punctuation, unusual capitalization and numbers
Words, phrases, or nicknames in the place of a middle name
Offensive or suggestive content of any kind
Characters from multiple languages
As per facebook rules, the profile name you use should be your real name as it would be listed on your credit card, student ID, govt-issued proof etc. So I personally suggest everyone to keep your facebook account of real name without any fonts or special characters.

So if your profile name limit is exceeded and want to change your facebook profile name to your real name, then Click Here 


Fill that form and you have to upload your valid Government-issued Proof - photo ID like a Passport or Driver's license etc and after your upload finishes, finally click "Send" button.

Any 1 Proof will be enough in the list of below examples,
Examples:
Green card, residence permit or immigration papers
Birth certificate
Personal or vehicle insurance card
Marriage certificate
Official name change paperwork
Voter ID card
Non-driver's government ID (ex. disability, SNAP or national ID card)
Note - If you don’t have a government-issued Proof-photo ID, you can submit copies of any 2 other documents that together show your full name, birthday and picture.
Any 2 Proofs will be needed in the list of below examples,
Examples:
Credit card
Utility bill
School or work ID
Library card
Check
Bus card
For more information about the Submission of Proofs, check the Facebook Help Center Page by Clicking Here.

Before you submit your any valid ID proof, try to have a real picture on your facebook account because this may help you to get your name change fastly as facebook staff will consider your fb profile as a real profile.

So when you submitted your proofs, facebook staff will verify it automatically and change your name to real name as which was listed on the proofs which you submit. This may take 4-5 days or 6-7 days like that. But we can't say any exact prediction that they will change our name within the specific time. Mostly it will take 4-7 days.

Also note that, when facebook staff verified your account and changed your name, then you won't be able to change your name again in future. All previous names which you had in your account will be removed. Only the new name will be seen and it will permanent.

My Personal Experience : Earlier I faced this problem and facebook asked me to submit any Valid proof and I submitted my College ID card picture by taking a snap from my mobile. Facebook staff verified it and changed my name within 4-5 days. So I suggest you to take a clear picture of your proof either by Scanning or by capturing from a good camera or mobile.

LEARN TO RUN WHATSAPP ON YOUR PC

WhatsApp is the most famous mobile messenger app of having amazing features like text messages, voice messages, images, videos, smileys, file sharings etc


How to use-install-download  Whatsapp on Pc/Laptop-how to use whatsapp on pc bluestacks -whatsapp on pc windows 7 -whatsapp on pc online

WhatsApp has now 350 million monthly active users and it became highly downloadable android app in few months.

WhatsApp is officially released for only Smartphones of Android, BlackBerry OS, Apple iOS, Symbian,Windows Phone but not for computer/laptop.

There are many softwares in internet which will helps us to run android apps on our Pc/Laptop but the best one is Bluestacks which will convert Android versions to Pc versions. So in this post we are using Bluestacks software for installing whatsapp on Pc/Laptop.

Note - Bluestacks is only supported on Pc/Laptop having graphic memory or graphic card.

Steps for Installing WhatsApp on your Computer/Laptop of Windows 7/8 or Mac :-


Step1 :

Download Bluestacks software by Clicking here.
After the download of bluestacks completes, install it on your Pc/Laptop.
After succesfull installation of bluestacks, there are two methods to install whatsapp on our bluestacks software.
Method 1: Open your bluestacks and you will see an option App Search or a small Search Icon on the top right corner. So now type Whatsapp in the search box and download it.

How to use-install-download  Whatsapp on Computer or Laptop - Windows 7/8 and Mac

Recently some people said that they have a problem in finding Whatsapp in Search box of App Search. So if you have any problem of finding Whatsapp in App Search then simply follow the below process of method 2,

Method 2: There is an Icon 'Help' on the homepage, so click that 'Help' button and it will redirect you to internet within the bluestacks.

How to use WhatsApp on Pc/Laptop ? ?

So when you are redirected to internet, you will see some URL field at the top.
How to use WhatsApp on Pc/Laptop ? ?

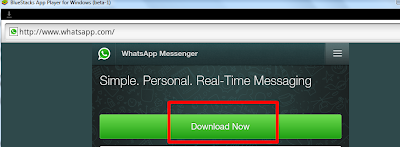
so now in that url field paste - http://www.whatsapp.com/ 
How to use WhatsApp on Pc/Laptop ? ?

and go there and download your whatsapp.

How to use WhatsApp on Pc/Laptop ? ?

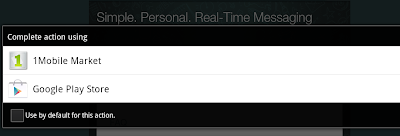
when you click Download Now button, bluestacks will ask you to choose a method to download whatsapp like in the below picture,

How to Use WhatsApp on Computer or Laptop - Windows 7/8 and Mac.

so you can select any method but choosing Google Play Store will makes our task easier.

Step 2 - Activating WhatsApp on your Pc/Laptop.


After your download of whatsapp completes, install it.
After Installing Whatsapp then it will ask you to enter your Mobile number for which you want to use your Whatsapp. 
Now verify your Mobile number by sms or call as the same procedure which we do for installing whatsapp on mobile.
Enter Verification Code and now Your whatsapp is successfully activated on your Computer/Laptop.
Open Contacts, 

and manually enter your friend contact nos who are using whatsapp.


Have Fun - Chatting - Voice messages and much more on your pc/laptop`s whatsapp.
One thing you should make a note is that you cannot use a same whatsapp no on your both mobile and computer. Those who dont have smartphones to use whatsapp on mobile can download this computer bluestacks version and can use whatsapp on your computer.